
To avoid having ads distract you when watching a video on YouTube, one has to pay a premium subscription. What if you don’t want to pay the subscription and you don’t want to have ads either? Well, we can implement an object detection application that will detect ads and then mask or remove them. In this tutorial, you will learn how to use deep neural networks to detect ads on YouTube. We will first describe how to collect and annotate image data from YouTube, then how to train Provision.io’s AutoML object detection module to perform the detection, and finally how to deploy the best performing model in a single click.
To test what I describe in this article, sign up for a free trial on Provision.io.
- Data collection
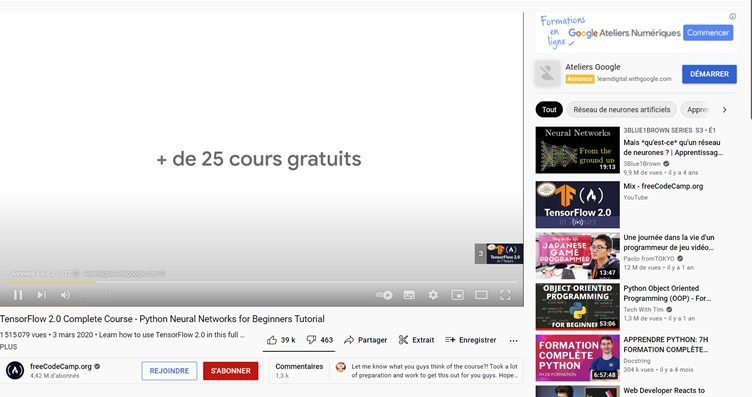
The dataset used in this tutorial is composed of 154 images manually collected and annotated from YouTube. The screenshots of YouTube’s website were taken in different scenarios; from the home page, when an ad is displayed on the website, and in videos. Below, an illustrative example of a screenshot.
In the next step, you will learn to manually annotate image data for object detection.
- Data annotation
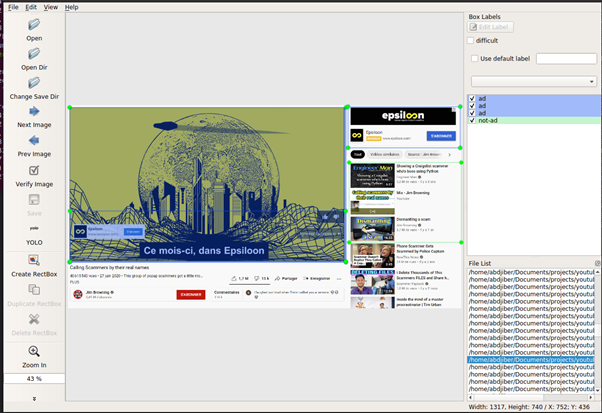
To manually annotate your image data, you can use labelImg, an open-source graphical image annotation tool. Installation instructions are provided here. Once the application is installed, first, set your predefined class names in predefined_classes.txt file located in labelImg/data, then click Open Dir to select the folder containing the images you want to annotate and Change Save Dir to choose the folder that will contain the annotations (one text file per image). Finally, click on the button under the Save button to set the output annotations in YOLO format (see here for more information about YOLO’s model). You are now ready to annotate all your images by creating bounding boxes and selecting the class corresponding for each.
Each line of the output annotated image contains the following values (in order):
- class_name: the index of the class name in the predefined class names file.
- x_center: the relative x-axis of the center of the annotated box.
- y_center: the relative y-axis of the center of the annotated box.
- width: the relative width of the annotated box.
- height: the relative height of the annotated box.
Once all images are annotated, you are now ready to train convolutional neural networks (CNNs) models with Provision.io’s object detection module.
- Training
Before training the CNNs models, you need to process the annotated data. It will consist in creating tabular data containing image names, the bottom-left (xmin, ymin), and top-right (xmax, ymax) absolute coordinates of the annotated boxes. Therefore, it is necessary to convert the following variables (x_center, y_center, width, height) into (xmin, ymin, xmax, ymax). Let img_height and img_width be respectively the height and width of an image. The absolute annotation coordinates can be obtained by performing the following operations.
img_height, img_width, _ = img.shape
xmin = img_width*(x_center - width / 2)
ymin = img_height*(y_center - height / 2)
xmax = img_width*(x_center + width / 2)
ymax = img_height*(y_center + height / 2)
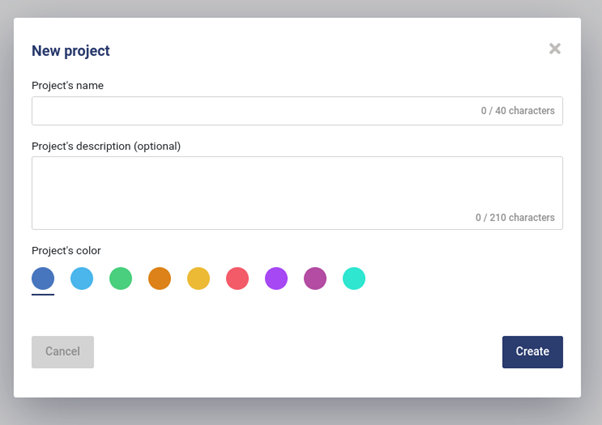
The next step will be to create training and test sets to train the models. To that goal, first, you need to log into Provision.io and create a new project by providing a project name and description.
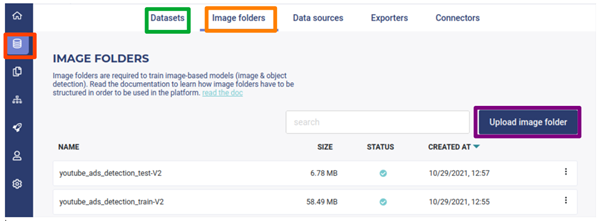
The next step will consist of creating tabular and image datasets in the platform by importing the corresponding files. To that end, click on the Dataset button (green rectangle in the following image) and upload tabular files (train and test) containing image names and absolute coordinates of annotated classes. To import image files, first, compress the files into a zip format and upload the latter from Image folders interface (rectangle in orange in the following image) by clicking on the Upload image folder button. If you do not want to create your own data, I have shared the link to the data I have used for this test. You can download it here.
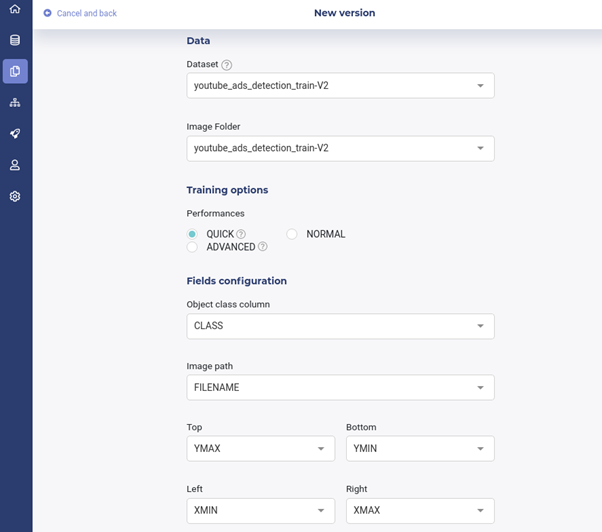
Once the experiment is created, the next step will be to provide training datasets (the preceding uploaded tabular and images) by clicking on the new version button. In addition to the datasets, training options should be set. The latter will indicate whether we want a quick training (get a result as fast as possible), normal (more time in hyperparameters optimization), or advanced training (get the best result but require high training time). Finally, variables corresponding to the image names, their classes and bottom-left, and top-right absolute coordinates of the annotated boxes should be set.
Once the preceding steps are completed, models can be trained by clicking on the train button at the bottom-right.
During the training process, illustrative examples of predicted classes by the AutoML engine such as in the following figure will be displayed.

Once the training is completed, the performance of each model can be seen, and predictions of new image instances and deployment can be performed.
- Model deployment
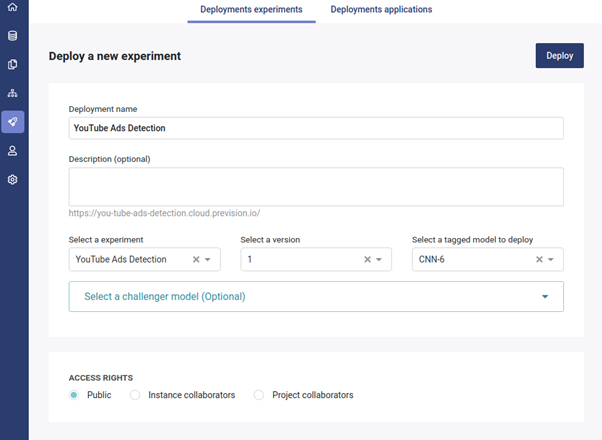
To deploy a model, for instance, the best performing model among the trained ones, deployment should be created from the menu by providing the deployment name, the model from the preceding experiment to deploy, and setting the access rights of the deployment.
Once the model is deployed, a user interface from which for instance local images can be uploaded for annotation will be generated.
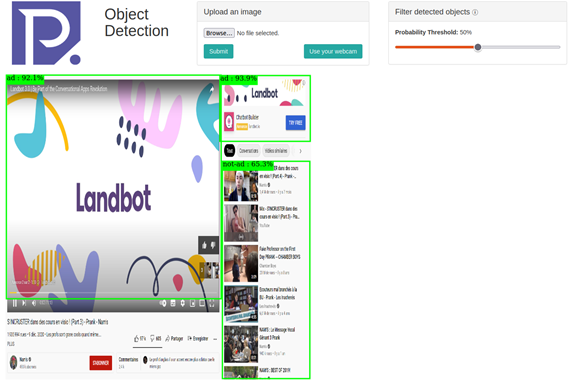
It should be noted that the prediction probability threshold can be set in order to filter detected objects.
In this tutorial, you have learned how to perform object detection with Provision.io’s object detector module. We covered the following steps:
- Data collection
- Data annotation
- Training
- Model deployment
These steps can be applied to any object detection task using Provision.io. If you already have a dataset, you can skip the first and second steps. It should be noted that only a few functionalities of Provision.io’s platform have been presented. For advanced settings, for instance training more accurate models by selecting the ADVANCED training performance option, deploying a challenger model against the best performing one from the deployment interface, and running all the preceding steps with Provision.io’s APIs (Python or R). We refer the readers to the following documentation.
An output of this work would be to develop a web application that can be deployed for detecting in real-time ads on YouTube. Once the ads are detected, they can for instance be masked and the browser can be muted until ads in videos are finished.
If you want to try, please do. Reach out for help if you need anything.
Summary of steps for replicating this experiment
- Sign up for a free trial here
- Download the YouTube ads datasets here.
- Create a new project
- Create new datasets (tabular and image) by importing the YouTube ads datasets
- Create a new experiment
- Create a new version of the experiment
- Create a new deployment
- Browser to your generated deployment link for testing your ads detector from local images.
To test what I describe in this article, sign up for a free trial on Provision.io.