
Introduction
This is the second in a six-part series on how to use Provision.io Python SDK to build production-ready and fully monitored AI models using your real-world business data. If you already have Provision.io SDK installed then you are ready to go. Otherwise, head over to the first blog post, follow the instructions and come back!
What Are We Doing Today?
In this blog post, we are going to see how we can easily import your local data into Provision.io using the Python SDK. Let’s dig in! Launch your code environment or Provision.io Python notebook and follow the steps!

Step 1. Authenticate to Provision.io’s Instance:
In order to make sure you have loaded the SDK and established the connection to your Provision.io instance, start by importing Provisionio and setting the token and the instance name by specifying Provision_URL and Provision_MASTER_TOKEN.Once done, just initiate your Provision.io’s SDK client by typing the code lines bellow:
import Provisionio as pio

# The client is initialized with your master token and the url of the Provision.io server
# (or local installation, if applicable)
url = "https://<your instance>.Provision.io"
token = "<your token>"
pio.client.init_client(url, token)
Bonus Code Lines: By the way, you can manage the verbosity, the duration you wish to wait for an asynchronous response, and even the number & the duration of retries for each call to the Provision.io API.
# You can manage the verbosity (only output warnings and errors by default)
pio.verbose(
    False,           # whether to activate info logging
    debug=False,     # whether to activate detailed debug logging
    event_log=False, # whether to activate detailed event managers debug logging
)
# You can manage the duration you wish to wait for an asynchronous response
pio.config.default_timeout = 3600

# You can manage the number of retries for each call to the Provision.io API
pio.config.request_retries = 6
# You can manage the duration of retry for each call to the Provision.io API
pio.config.request_retry_time = 10
Step 2. Project Creation:
Everything is working fine? Let’s move to the project’s creation! This step is mandatory to go through to be able to upload data and train an experiment.
As already mentioned in the first blog post, we’ll be dealing with forecasting electricity consumption. So, we’ll go for “Electricity Forecast” as the name of the project and “This project has been realized in the context of Python SDK blog post series” as its description. To do so, follow the code line bellow:
# create project
project = pio.Project.new(name="Electricity Forecast",description="This project has been realized in the context of Python SDK blog post series")
Once run, we can verify the project’s creation by heading over to Pervision.io’s UI or by using the following code to list all the projects to which you have access:
# List all the available project in the current active [client] workspace: names
for p in pio.Project.list():
    print(p.name)
# List all the available project in the current active [client] workspace: ids
pio.Project.list()

# List all the project’s info
project.info()
If, by any chance, you want to share your project with someone on your Provision.io’s instance, feel free to do it on the platform.

Add Collaborators To Your Project
Done? Verify the addition of the collaborator by typing the following code line!
# Once your mate is added, List all the project’s users information
project.users()
We do offer some collaboration capabilities and right management. To do so, make sure to write the email of your colleague as well as specify his role from the following choices:
- admin, for complete access
- contributor, read & write access but can’t demote admin
- viewer, read-only access
Bonus Code Lines:
# restore previous project
project=pio.Project.from_name(name="Electricity Forecast")

# Delete a given project!
#Ps: don’t delete your present project ’Electricity Forecast’.. Still have long path to go ;)
project.delete()
Step 3. Dataset Import:
As of now, the project is totally empty. We need to fill it with some data in order to move forward. To facilitate this tutorial, we have already prepared a training and a validation (holdout) dataset for you. Here they are:
The training data set is about the electricity consumption of France on a 30’ time step starting from 2014-01-01 and ending on 2020-12-31. The testing dataset starts from the 2021-01-01 and ends the 2021-09-30.
Each dataset has 7 features :
- TS, the time stamp
- TARGET, the actual consumption of electricity (in MW)
- PUBLIC_HOLIDAY, boolean, 1 if (french) public holiday 0 otherwise
- TEMPERATURE, mean of temperature across France in °C
- LAG_1, 1 day lag of TARGET value
- LAG_7, 7 days lag of TARGET value
- fold, technical identifier used for cross validation strategy, based on year of TS
Because this kind of use case is sensitive to temperature and also to special days, we have a good starting point here even if we could get more features in order to obtain a better model. The point of this tutorial is to keep things easy 🤓 (even if the final showcased app is based on a slightly more complex model with more features involved).
To upload the data on your Provision.io instance, you can either use a created data source, a file path or a pandas.Dataframe .
If you’re interested in managing data sources and connectors, feel free to check the documentation.
# Upload tabular data from a CSV file
data_path = 'path/to/your/elec_train.csv'
dataset = project.create_dataset(name='Training_data', file_name=data_path)
# or use a pandas DataFrame
dataframe = pd.read_csv(data_path)
dataset = project.create_dataset(name='Training_data', dataframe=dataframe)
# or use a created data source
datasource = pio.DataSource.from_id('my_datasource_id')
dataset = project.create_dataset(name='Training_data', datasource=datasource)
This will automatically upload the data as a new dataset in your workspace. To check if the dataset was appropriately uploaded, you can either go to the online interface and check the list of datasets(in the “Data” tab)
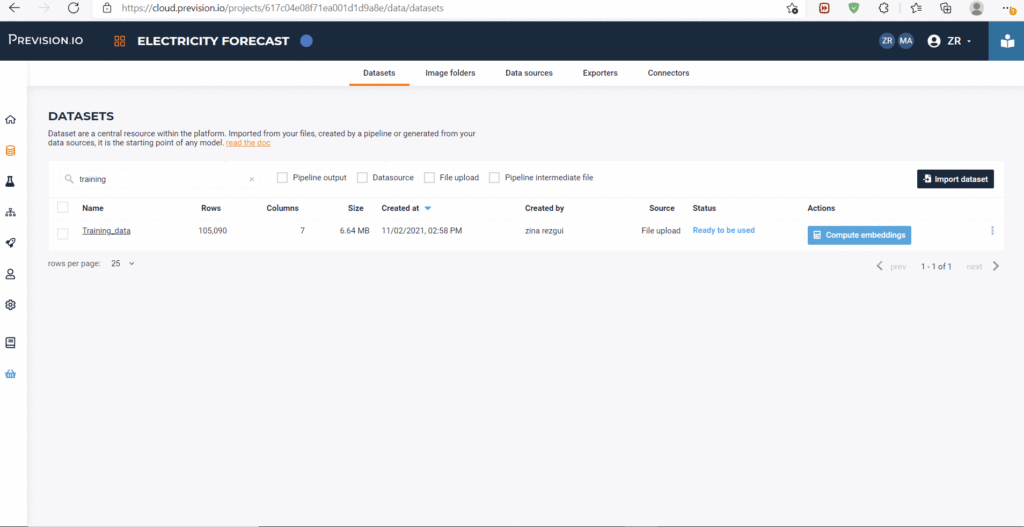
Access Your Uploaded Datasets and Detailed Analysis
For the Code_only ones, just type the following code lines:
# List tabular datasets
datasets = project.list_datasets()
for dataset in datasets:
    print(dataset.name)
Bonus code lines:
# grab locally the created/uploaded dataset in your workspace
out_path = dataset.download(download_path="your/local/path")
# To retrieve a dataset by its id
dataset= Dataset.from_id(dataset_id)
# to delete a dataset from your workspace
dataset.delete()
What’s Coming Next?
Now that data sets are being imported & parsed into Provision.io, you can access statistics directly from the UI or just move to the next blog post series in which we will make Machine Learning models on them 🧐.